

DIY Church Pew Bench
- Jennifer Bell
- Sep 4, 2022
- 4 min read

Updated: Nov 14, 2022
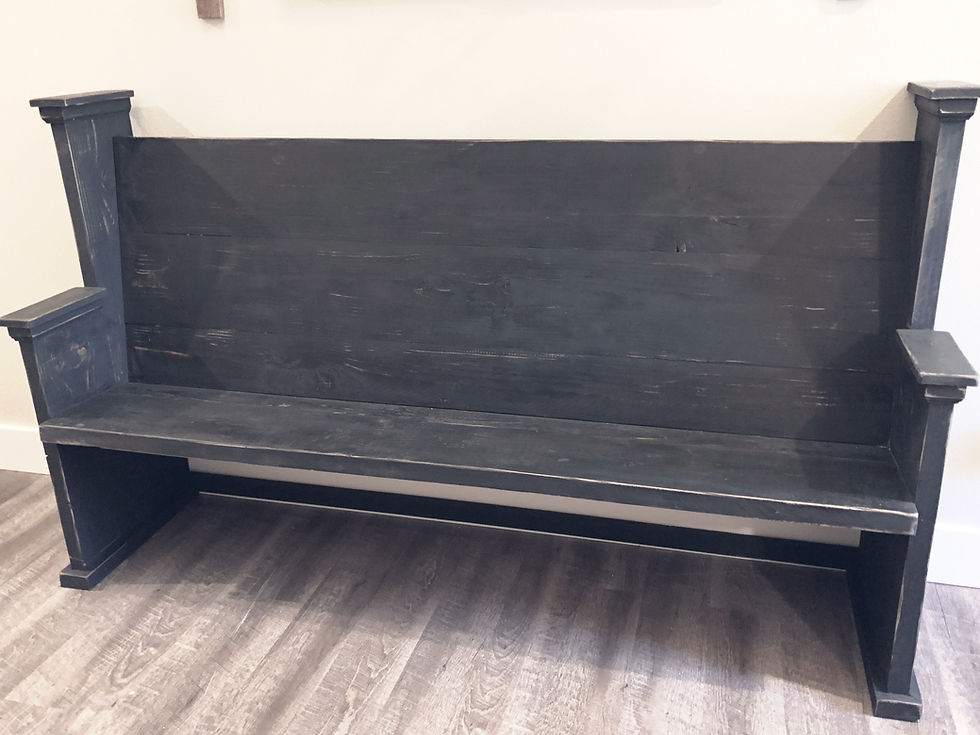
Church Pew / Bench A few years ago I designed and built the cutest "church pew." We had so much scrap lumber from other projects that it was literally pushing us out of the garage! I decided to dig through the scrap pile of lumber we had in the garage, and see if I had enough to build my design. It had to be narrow to accommodate our awkward entry.
The only pieces of lumber I bought were the 2x12's, I think. The rest we had on hand. I will leave a list of the tools and materials I used down below.
I sat down with SketchUp, and came up with the plan below. There is a free, web version of SketchUp, available . I highly recommend that you watch a few videos on YouTube and learn to use it, because SketchUp helps organize and simplify the planning process. (Hey, SketchUp guys, I'm waiting for your sponsorship call! I'm sitting by the phone right now.)
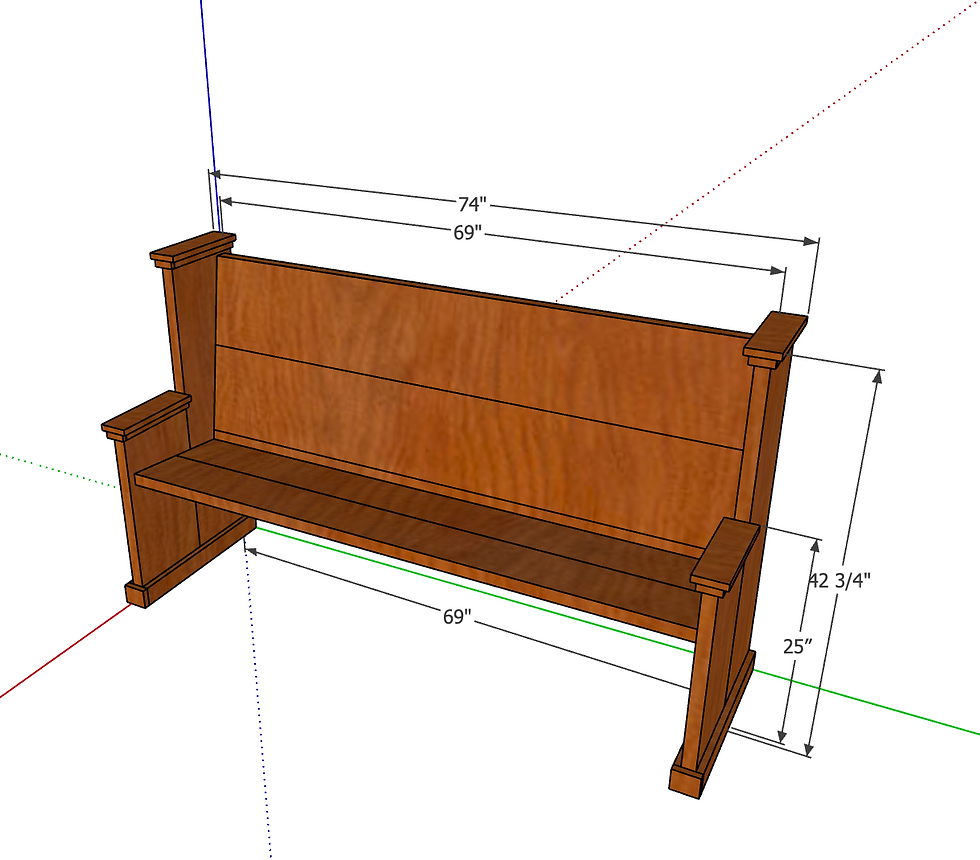
First, in order to create my design, I sat in the most comfortable desk/kitchen chair we had and measured from my bent elbow to the floor, from the back of my knees to the floor, from the back of my knees to the back of the chair, and also used a protractor to gauge the angle of the seat back and the seat itself.
Most seats are about 18” from the floor. I am 5’4” tall, and have legs on the longer side. 18”-19” is what is most comfortable for me. My seat back is set at 14 degrees. The seat itself, if I remember right, is about 7 degrees. The knee area of the seat is slightly higher than the point where the seat joins the back. I really hope that makes sense!
Next, I measured the space I needed to fill, length and depth, and then from the floor to the bottom of the artwork on the wall. I came up with the plan in the image above. You are welcome to duplicate my bench, using my measurements, but I challenge you to try making a truly custom bench. It would make a GREAT homeschool math project if you're into that!

Since I was using builder grade lumber, I ripped the rounded edges off of every board and joined them together with pocket holes and pocket hole screws. I think this gives the lumber a more finished, custom look. This step is 100% optional. You don't have to do it, but if you decide to try it, remember that you will be losing about a half-inch from every board. I'm NOT a math person, but if I can do this, you can do this!
I had planned to join my bench using only wood glue and pocket hole screws, and I'm sure I could have done so if I'd had someone who could help hold it together while I worked. However, my husband is an airline pilot, and was probably sleeping in a peaceful hotel while I dealt with the kids, dogs, building, etc. Because I work alone, (oooh, see what I did there? I channeled my inner Mr. Incredible!!), I decided it would be easier to use supports for my seat and back pieces. And it wouldn’t hurt to have that additional support cleat reinforcing the seat and back.

I was a little concerned that the legs might splay over time, so I decided to add a 2x2 to the bottom back of the legs just to make it a bit more rigid. I do have five kids, five horses, two Newfies, etc. We're hard on stuff. Also, though I don’t have a photo, I did add a handle on each side of the back, where it was most comfortable to lift. I wanted to make it as easy as possible to move around.

I painted my bench in Ink, from the Waverly Chalk Paint line by Plaid. I got it at Walmart. This paint is very thick and almost appears gelatinous when poured straight from the container. I like to thin it with 20-30% water. It goes on very smoothly and dries beautifully. I applied two coats, sanding lightly between.
When both coats were completely dry I distressed the bench with my palm sander, then sealed the paint with Waverly's Clear Sealing Wax. I know some people put it on lightly, but I like to do things the hard way, and I applied liberally! :)


This bench fit the space perfectly, however, we needed more storage! A few months after I built it, I sold the bench for $275 on Facebook Marketplace. Not bad, considering it took me a couple of hours to build, and used mostly materials that were only taking up space on my garage floor. I built a custom buffet to replace the bench. I will post about that later! Sorry guys... I do use affiliate links, from which I may earn a tiny commission, which helps me continue to produce content for your enjoyment, so I have to post the disclaimer here. **By using our website, you hereby consent to our disclaimer and agree to its terms.**
The links contained on our website may lead to external sites, which are provided for your convenience. Any information or statements that appeared are not sponsored, endorsed, or otherwise approved by Curiosities & Calamity @Plantation Pandemonium. Curiosities & Calamity @Plantation Pandemonium cannot be held liable for the availability of, or the content located on or through it, and/or any losses or damages occurred from using these contents or the internet generally.
Materials:
Below are links to the tools and products that I use, but you can use any brand. I encourage you to get the best tools you can WITHIN YOUR BUDGET!
Chop Saw
https://amzn.to/3AL7iPy
Table Saw
https://amzn.to/3BbQO4i
Palm Sander
https://amzn.to/3BeLWM5
Drill
https://amzn.to/3AFmD40
Kreg Pocket Hole Jig
https://amzn.to/3TT4Orl
Kreg Pocket Hole Screws
https://amzn.to/3Bb72L1
Wood Glue
https://amzn.to/3qbXRUk
2-1x2”x8’
1-2x2”x8’
2-1x12”x8’
2-1x10”x8’
*optional* 1 8’ cove molding

Comments